

Need to have ...
- Graphite Pencils: 4B, 2B, B, 2H, and 4H
- A good sharpener
- Paper: For detailed, realist graphite pencil drawing, you need a sturdy paper which will cope with repeated erasing and working, and a fine texture which will allow you to create the illusion of surfaces like glass, metal or skin. Most drawing paper has a coarse texture which works against you.
- Eraser assortment (gum, kneaded, plastic, etc.)
- A good light to work under
Nice to have ...
- The entire range of pencils - 9B through 9H
- Ebony Pencil (a very soft dark pencil)
- Lap tray (or other comfortable working area)
- Index cards for making masks
Tips!
Keeping your drawings clean
Graphite drawings can easily get messy, so it’s always a good idea to use something, like a sheet of paper under your hand, to avoid smudging your drawing. You can also try to work from left to right if you are right-handed or right to left if you are left- handed to minimize the risk of having your hand going over an already drawn area.Even if you just washed your hands, there is always a tiny residue of oil on your skin that might go onto the paper and make the graphite more difficult to remove. For that reason, you might want to avoid blending with your finger. Experiment with different materials — tissue paper or cotton swabs work well for that purpose as well as stumps.
Using the right pencil grade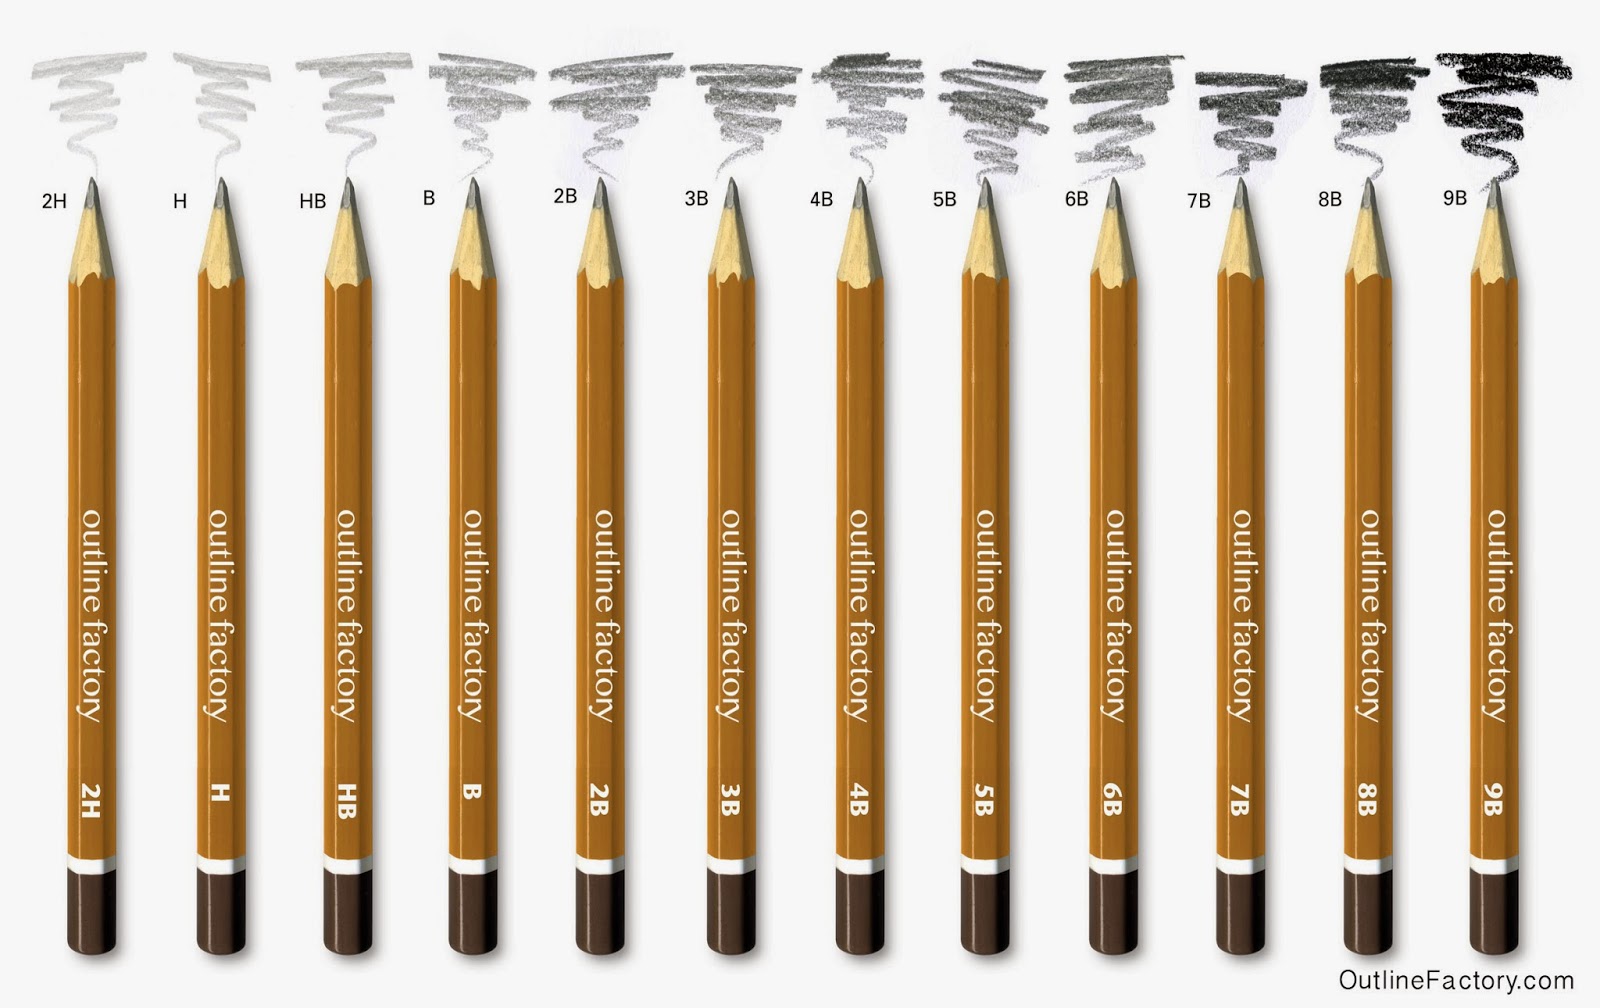
Pencils have different grades ranging from 9H to 9B. H stands for
hardness and B for blackness, so a 9H pencil will be very hard and
light, and a 9B pencil will be very soft and black.Harder pencils are easier to erase but more difficult to blend. Harder pencils are sharp and can be used for details. Use HB for midtones, H for highlights and B for darker tones.
Erasers
Erasers are a very convenient tool when drawing with graphite. They can be used to erase mistakes or to carve out lighter areas in an already drawn area in subtractive drawing techniques.Kneadable erasers are great because they can be shaped in a fine point and won’t leave any residue. Poster putty can be used the same way you would use a kneadable eraser, except it is a little bit more sticky. It works well to gradually remove graphite - each time you use it on the paper, it will remove a bit more graphite, gradually lightening the area without damaging the paper.
Tutorial 1 - Practicing
Try to get a wide array of tones on your drawing ranging from very
light to very dark. You will realize how many tones each pencil can make. A true black is difficult to obtain with graphite
because when the paper is saturated with graphite, it will glare. You
can use charcoal in your pencil drawings to obtain a real black.

Cross hatching (picture 2) is such a well-known method that nearly every artist has encountered it, and it’s exactly what it sounds like. After laying down one pass of hatch marks, another set of hatch marks are drawn on top, usually in a perpendicular or near-perpendicular direction to the first set. This method is one of the quickest and most effective ways to vary the density and darken the values in your hatching.
Fine cross hatching (picture 3 and 4) is the richest and most subtle form of cross hatching, and might even read as a tonal or pencil-shaded drawing from far away. The method is the same as above, with several layers of cross hatch marks rather than just two, to create even more nuanced differences in tone and value.
Spend half hour practicing each of the pencil drawing techniques
Alternate between light and heavy shades, and make notes of which techniques you find the most comfortable for you.
 Blending is basically merging different shades together,
so that each shade flows smoothly into the next creating a very soft
and realistic tone. It is especially useful for fill color and creating
depth and texture which we will cover in the next and final part of Tutorial 1.
Blending is basically merging different shades together,
so that each shade flows smoothly into the next creating a very soft
and realistic tone. It is especially useful for fill color and creating
depth and texture which we will cover in the next and final part of Tutorial 1.To blend pencil, you will need either a Blending Stump or a Tortillon (see picture).
Again, another debate within pencil drawing is whether or not to use your finger to blend. I say NEVER! Your finger is rich in natural skin oils, and every time you touch the paper with your bare skin you are transmitting these oils to the surface of the paper and these oils will not let go of the graphite, almost acting like a glue. That’s not a good idea, because adding or taking away graphite to these areas then becomes a little tricky, and can compromise the whole piece!
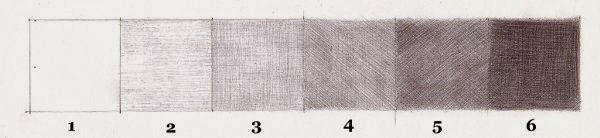
Using a small circular motion, use your blending tool to blend the second block on your Shading Guide. It is important to note when shading, that you should always go from light to dark, as a lot of graphite can ‘stick’ to your blending tool, and will carry to the next shade or gradient.
Now gently merge block two into block three, using the same circular motion, and ensuring the blending is kept very tight. You can increase the pressure slightly for each block.
Repeat the above process for the remainder blocks, moving in the same circular motion and keeping the blend tight between blocks.
If your blending doesn’t look like it has merged nicely, and you can see a clear distinction between two blocks, then continue blending using the small circular motion. It will merge smoothly eventually, just have some patience with it and don’t put so much pressure on that you wear away the paper!
Tutorial 2 -Illustrate
Now when you have the feeling for how the hatching works, lets try to use it. Next step is the fun part. I have created a step-by-step photo series to make it easier for you.
Draw two half circles centered on the paper

Outline the apple stem on top of the circle. It doesn't matter if you cross the lines.
It won't be visible when the drawing is done.
It won't be visible when the drawing is done.

Draw the contour of the apples leaf.

Put in some details. It will make it easier for you when you makes the structures later.

Use the parallel hatching as you have been practicing.

Use different directions to highlight the contours and give the object a round shape.

As more you work with the fine cross hatching as more shape the apple gets.

Draw two circles under the apple. The inner circle will become the darkest shade and the outer circle will become the fading shade. This effect will "place the object on the table".

Gently fill the circles with parallel hatching, just enough to point out the working area.

Now continue work with cross hatches. You will see how the apple
looks more realistic now when it stops "floating around" on the paper.

Finally, use the tortillon in small circles to smooth the shades.
Mix between the tortillon and the pencils for the best result.
Mix between the tortillon and the pencils for the best result.
I hope this will be a motivation for you to use the graphite pencils more int the future.
It is amazing how many "colors" a grey pen rooms. It is only a matter of technique.
It is amazing how many "colors" a grey pen rooms. It is only a matter of technique.
Please leave a comment and let me know how it worked out for you.
And if you have any questions i will do my best to answer them.
And if you have any questions i will do my best to answer them.
Thanks, Trine
